Interface
The LPM interface is rather simple. It consits of a main frame and different preference windows.
The main frame interface is based on a «tree» structure. It includes groups of passes, passes, shots and different sub-pass elements, which are responsible for different overrides.
Using the tree view
Adding a new pass, a group or execution of group actions with passes can be done with a right mouse click on a root element or any empty space of the tree view.
All child elements of the pass can be moved, copied (holding CTRL), copied with instance (holding shift), drag’n’dropped or copied via right mouse button menu of the element and pass. Instances are marked with italic letters.
For editing preferences of any element you need to either double click on it or press “edit” in the right mouse button menu.
Deleting of elements can be done either the right mouse button menu or by pressing DEL.
Renaming elements can be done either via a long double click or by pressing ENTER or F2.
All elements except Object set and Light set can be either active or not active. Switching between those states can be done by pressing the element icon. Inactive passes are not rendered at the final render. Overrides of inactive elements do not apply while rendering.
Some elements support Viewport previews (Pass, Shot, Object set and Light set). When pressing on those elements with the third mouse button objects will be indicated and lighters will be switched on in accordance to the pass logic, Object set and Light set. Which overrides will be applied in the pass preview in Viewport can be adjusted in LPM’s main preferences.
The tree view supports undo of last actions via CTRL+Z and update via F5.
Multiselect is not supported.
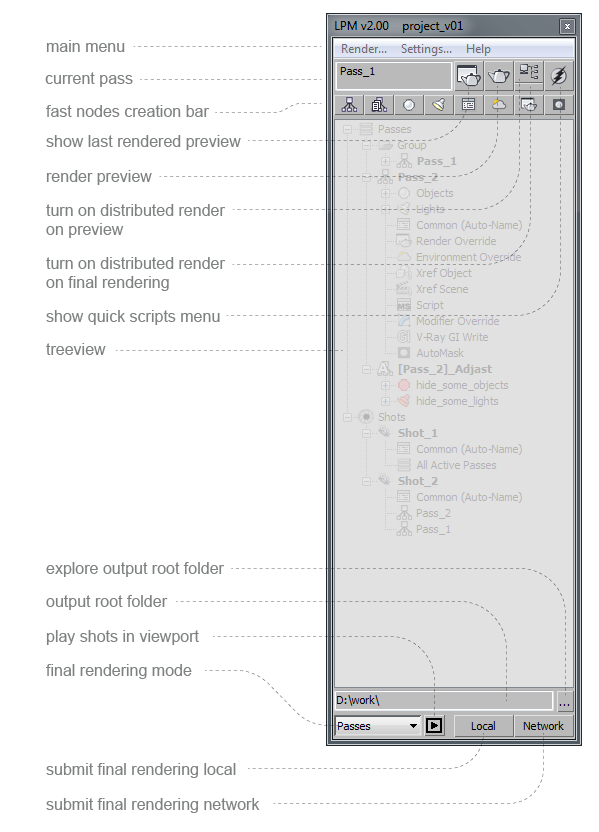
The current pass name and buttons can be found on top of the tree view:
– Displays the last rendered pas image, if exists – show the last pass preview, if it exists.
– Render active pass – render the preview of the current pass.
– Distributed rendering – using of distributed render.
– Quick scripts.
“Render active pass” button activates rendering of one shot (even if sequence is selected in preferences) with all overrides applied, whereas 50% resolution render can be performed by holding the SHIFT button.
Next line of buttons is dedicated to most popular actions which can be performed via one click. Buttons change dynamically depending on the chosen element. Addition options are available with SHIFT pressed down (see pop-up hints).
At the botton of the tree view the current root folder indication can be found. The root folder can be switched in edit-mode through a double click on this area or by pressing ENTER, typing the folder name and pressing ENTER or pressing ESC to cancel. The other way to change the folder is through the “Render” menu of the main frame.
A fall-down menu with final render options can be found below this area. While “Passes” mode selected, all active passes and groups will be rendered in top-to-bottom order. In “Passes Hardware Preview” mode the hardware render of all active passes and groups from Viewport will be made in top-to-bottom order. The two remaining options work the same way. Hardware render depend on preferences selected at last manual save of Viewport’s preview.
Finally, the button “Local” renders all active passes or shots on your local PC, while “Network” sends the render task to Backburner, Deadline or any other manager depending on the chosen plug-in selected in LPM’s main preferences.